Setting up Microsoft Word for Your Term Paper
Part Two: Setting Up Microsoft Word for Term Paper
Introduction:
Welcome to the training program on Setting Up Microsoft Word for your Term Paper. This is part two of the training program on “How to write a term paper”. In this training, we will be setting up MS Word for our term paper question in part one. If you have not read the part one post, kindly click on this link to go through it before continuing with this part. The training is divided into 7 practical steps to guide you set-up your MS word for any term paper.

Step 1: Launch MS Word

Search for MS Word from your Computer and Launch it.
Step 2: Typing the outline and structure of the Term Paper in MS Word
Ensure the Home Tab on the Ribbon in MS
Word is active, if not click on it to make it active.

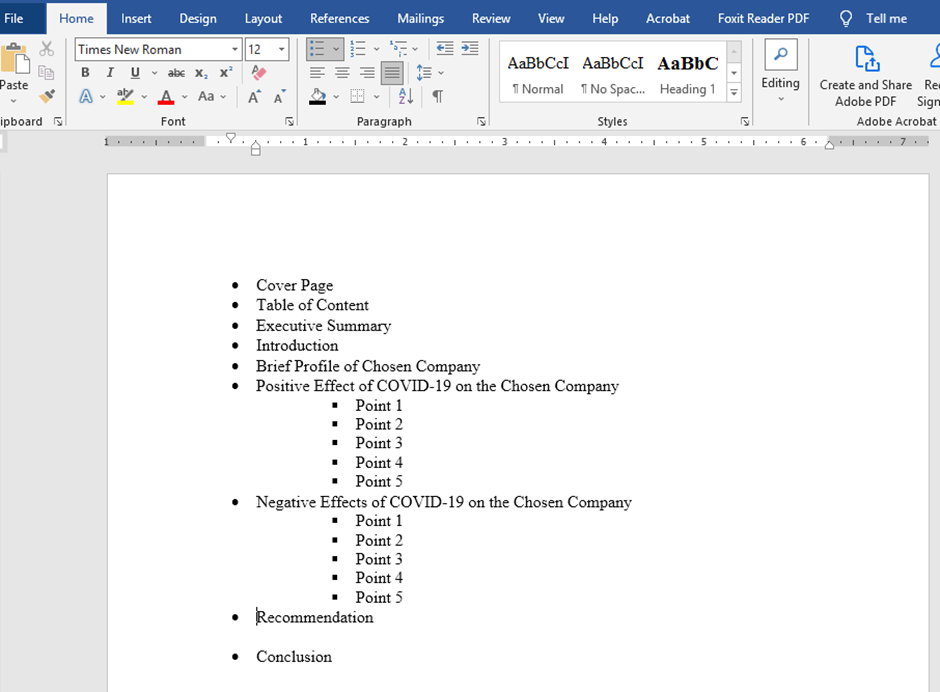
Type out the structure/outline of your Term Paper
in the first page
Next, Press Ctrl + S on your keyboard to
save your document.
Save it with your full name, ID, and course
name. I have saved mine as how to write term paper part one.
Step 3: Applying Heading Styles to Sub-topics
Next, place the insertion point after the Cover Page, the word page and press the ENTER key twice. This removes the bullets. Repeat this process for all the remaining sub topics. NB. For the Positive Effects and Negative Effects, press the ENTER key three times to exit out of the bulleting style.

Next, click in between Cover Page and Table
of Content.

Then press Ctrl + ENTER. This will move the
remaining sub-topic to next page.

Next, place the insertion point before the
letter C in the Words Cover Page and press the BACKSPACE key twice to remove
the bullet.

Next, move to the second page.

On the Second page, click anywhere in the sub-topic:
Table of Content.

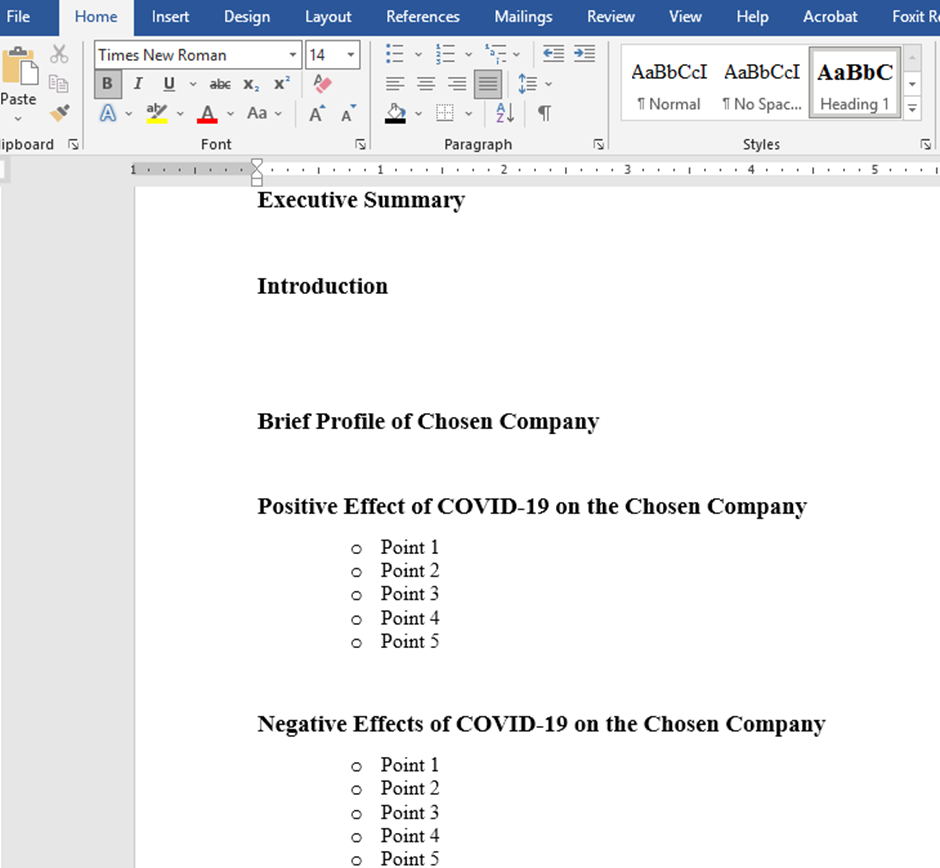
Now under Styles, from the Home Tab, Click
on Heading 1.
Repeat for
the remaining headings.

Next, place the insertion point in between
any tow letters of Cover Page and
Step 4: Adding Page Breaks to your Term Paper Document
Go to page second page.
Click in between Table of Content and
Executive Summary.
Press Ctrl + ENTER to move the remaining
headings to the next page.

Next, click in between Executive Summary
and Introduction.
Press Ctrl + ENTER to move introduction and
the rest to the next page.
Next, move to the first page, thus, the
cover page.

Ensure you are in page 1 of 4 (or 1 of any
number).
Click after the Words Cover Page and press
the ENTER key four times. To create more space on the page.

Right at that spot where the insertion point
is, click on Layout on the Ribbon.
Click on Breaks, under Page Setup Command
Group.
Click on Next Page.
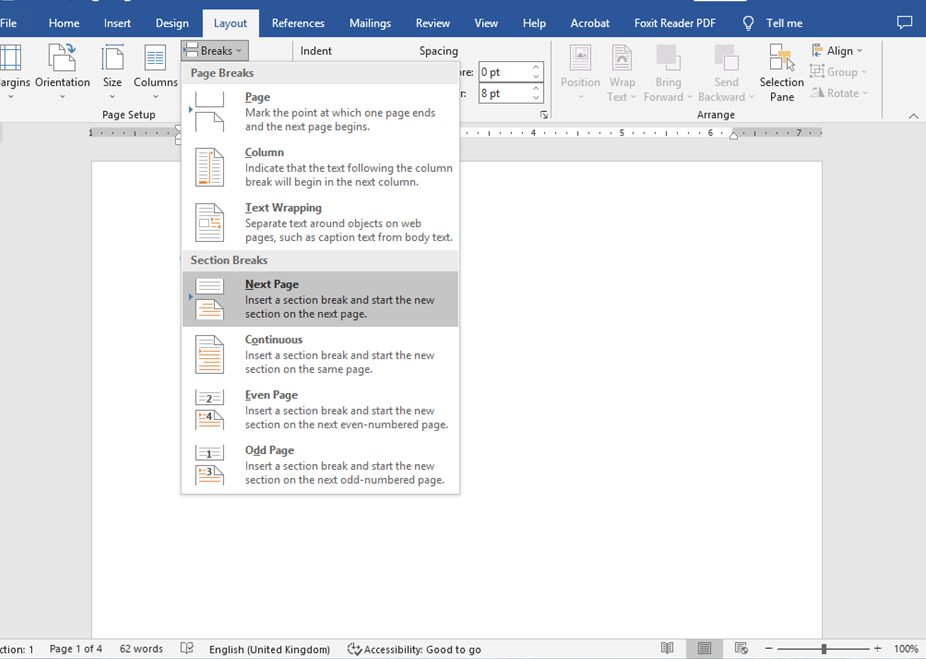
If this is successful, your status bar will show you are in Section 2. In other words, the Table of Content and the rest will be section 2 while the Cover page will be Section 1. However, we want three sections so we can number them differently. For the Cover page, it must not be numbered. The Table of Content page and the Executive Summary must be numbered with Roman numerals, thus, i, ii, while from Introduction to List of References must be numbered from 1 through 2 to the last number…. This is how we achieve different numbering for different parts of a document.

Now move to the Executive Summary Page,
Click right after it and press the ENTER
key four times.
Then click on Layout, Breaks, Next Page. If
this is successful, you will have three sections with the status bar reading
Section: 3 for page 4 of 4.


Step 5: Adding Page Numbers
Navigate to the “Cover Page” page.
Double-Click the Bottom/Footer Section of
the Cover page/First page.

Next, click on Different First Page (check
it), under Options Command Group.
Next, Scroll down to the footer section of
the Executive Summary Page. Ensure that while you are there, the Status bar
reads section: 2.
Next, Go to Page Number under Header &
Footer Command Group to the left of the Ribbon (on the Activated General Header
and Footer Ribbon).
Next, move the mouse pointer gently on to Bottom
of Page and then gently to right to Plain Number 2. Click to select Plain
Number 2.

If successful, the current page number
should read number 2. However, we want it to read “i” and then “ii” on the
Executive Summary’s page as well. So, let’s format the page number.
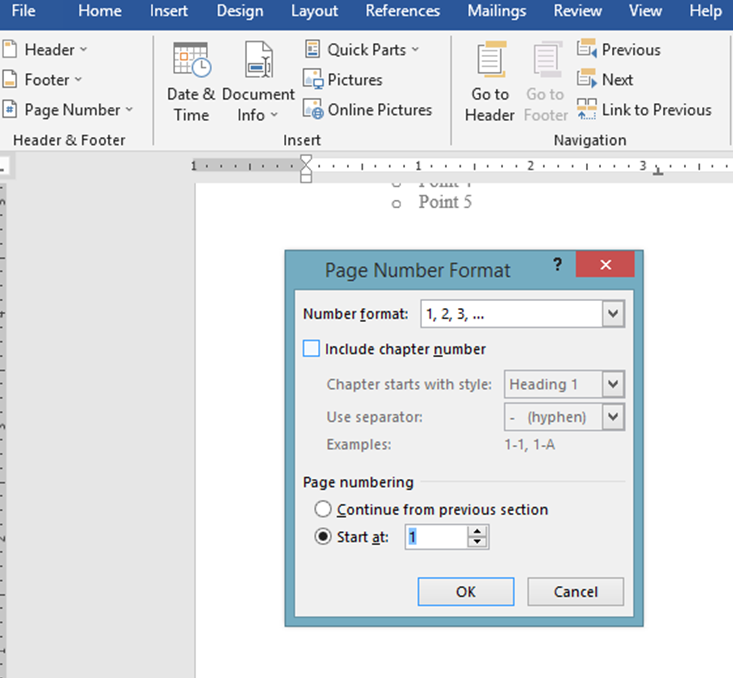
To Format the Page number as Roman
Numerals, while in page 2, footer section, click on Page Number, under Header
& Footer command Group.
Next, click on Format Page Numbers.

Next, from the Page Number Format Dialog Box, Under, Number format,
click on the drop-down arrow and select “i, ii, iii”.
Under, Page numbering, select the Start at radio button. This will
let it automatically start at i.
Next, click on Ok.

Next, navigate to page 4, the footer
section of it, the page number there should read 3. Click where the 3 is.
Next, click on Link to Previous, under the
Navigation command group, on the Ribbon. This discontinues the numbering applied
to the previous section.
Next, click on Page Number, under Header
& Footer command Group from the Ribbon,
Click Format Page Numbers.
Next, from the Page Number Format dialog
box,
Select the 1,2,3 number format.
Under, page Number, select the Start at
Radio button. This will automatically start at number 1. If it does not, use
the down and up arrows to start from 1.
Step 6: Insert Initial Scientific/Automatic Table of Content
Next, go to the Table of Content Page.
Click right after the words “Table of
Content” and press the ENTER key four times.

Next, click on References Tab on the
Ribbon.
Then click on the drop-down arrow by Table
of Contents under the Table of Contents command group.

Next, select, automatic table 2.
If successful, this is how your table of
content page should look like.

Step 7: Setting the Font, Line Spacing
Based on the instructions of the term paper, we were asked to use Times New Roman, Font Size of 12, line spacing of 1.5. We are going to do ensure our document set-up for the term paper meets these requirements. In addition, the document must be justified. Thus, from Introduction to conclusion, the content must be justified. The Executive Summary too must be.
To do this, click inside the heading “Introduction”, thus, place the insertion point in between any two letters of the word “Introduction”. This will activate the Heading 1 style in the Styles command group.
Next, right-click on Heading 1 style from
the Styles command group on the Ribbon, under the home tab.
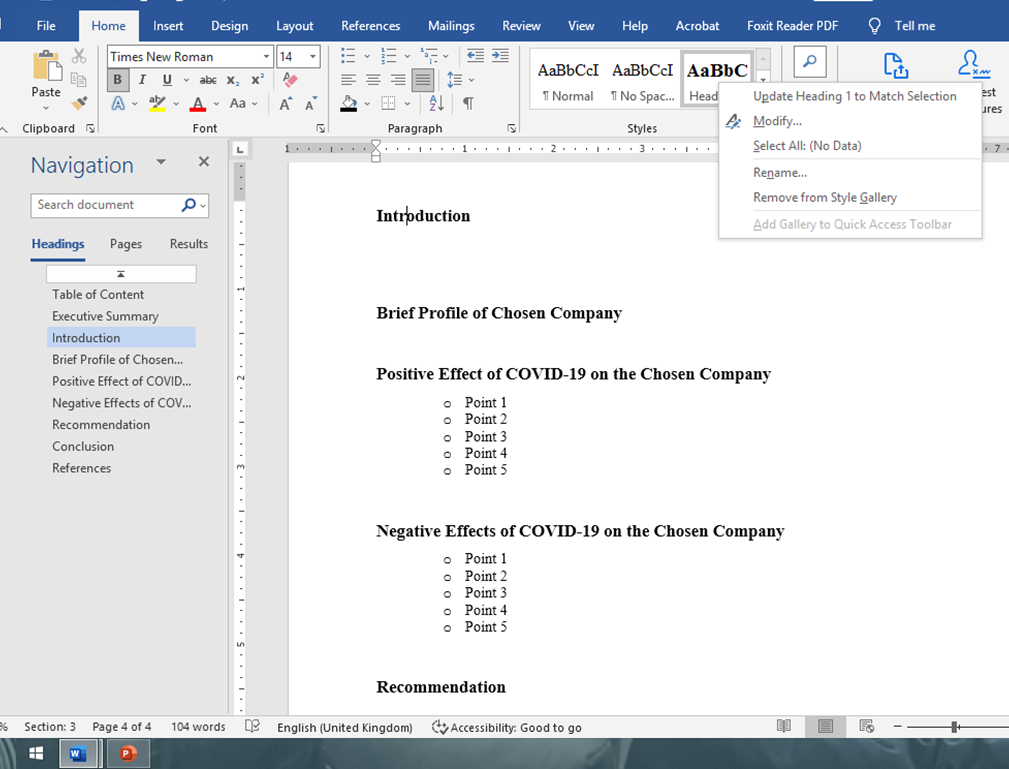
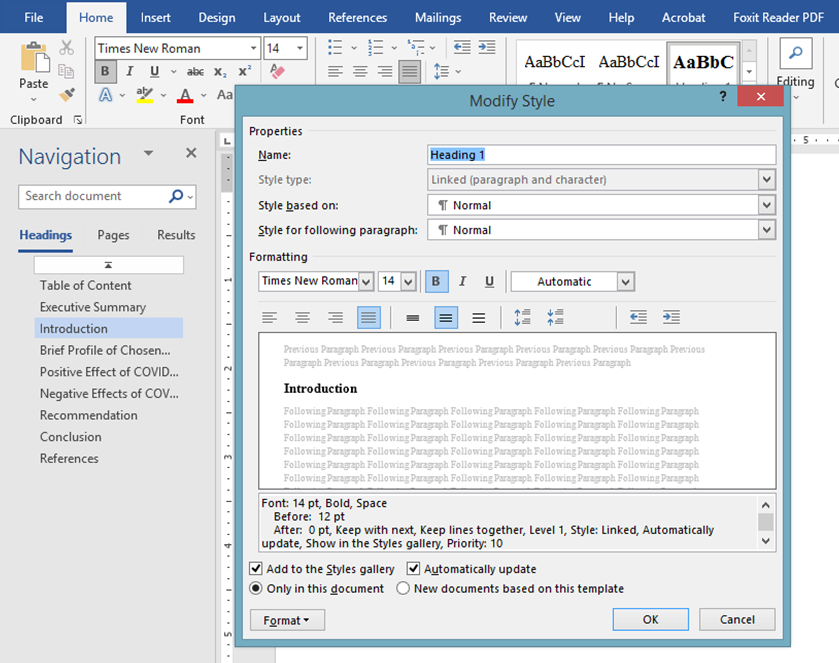
Next, click on modify. From the Modify
Style Dialog Box,
Ensure that Under Formatting, the Font in
the text box is Times New Roman. If you want Arial, you can select the Times
New Roman Font and Type Arial to replace it.
Next, type 12 to the right of it where it
reads 14. That is the font size. Ensure that B is selected.
Next, move down, and check the
automatically update box.
Click on ok to close the dialog box.
Next, let’s format the Normal style. The
Normal Style is what controls all other text apart from the heading styled-texts.
Thus, the cover page text, the table of content text, the executive summary
text, then from introduction to references text. Let’s see how that is done.
First, click right after the heading “Introduction”.
This will activate the Normal style in the
Styles Command group.
Then, right-click the Normal Style, under
the Styles Command Group, under the Home Ribbon.
Next, click modify.

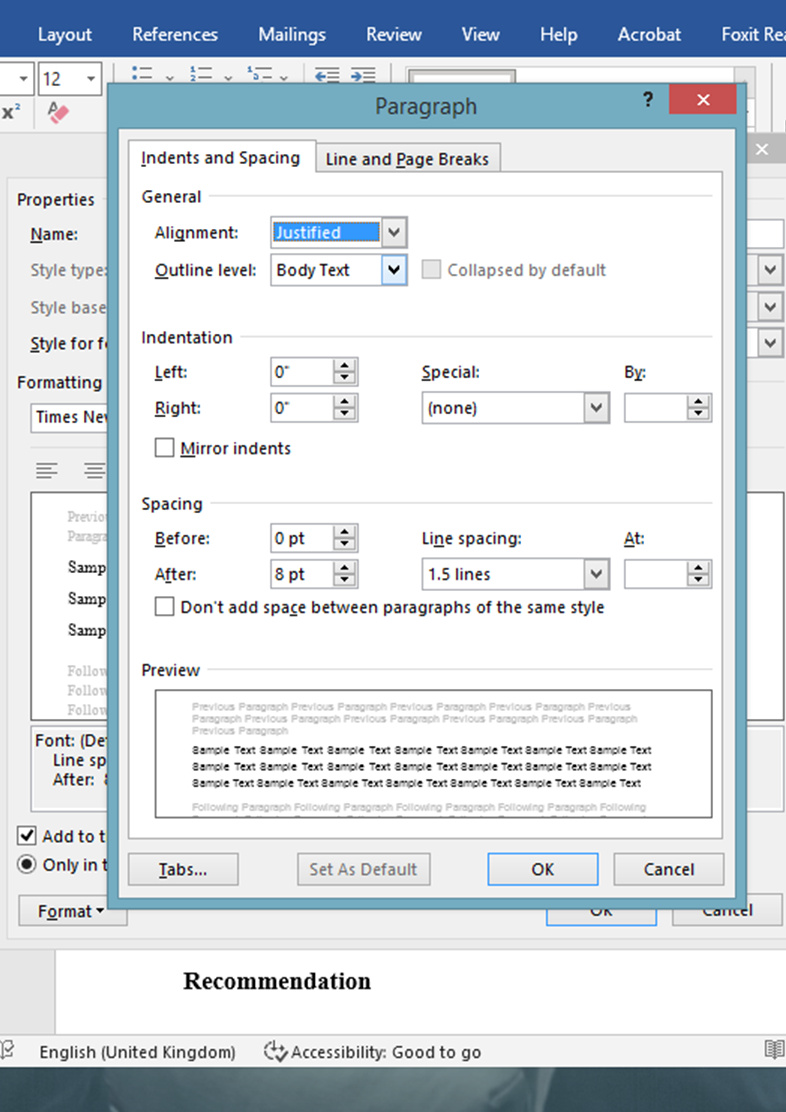
From the Modify Dialog Box, move down to
the lower left of the dialog box.
Click on the Format tab.
Select paragraph.

Next, from the Paragraph dialog box, Under
General, click on the drop-down arrow besides Alignments to select justify if
that is not the default. Ensure that Outline level is set to Body Text.
Next, Under Spacing: click on the drop-down
arrow besides Line Spacing and select 1.5 lines.
Next, click on Ok.
Next, thus, after clicking Ok from the
Paragraph Dialog Box, ensure that Under formatting, the Font is Times New Roman
(or your preferred Font), and the size is 12.
Next, click on ok.

Next Steps
Thank you for reading this post. Kindly
look out for the next parts: 3, 4 and 5 to complete the entire training. Part
three focusses on the techniques to get the required word count, part four on getting
sources for your term paper, and part five on how to synthesise your sources to
answer the term paper.
Follow Masters Companion on
Facebook:
Masters Companion
Call the Lead Training Consultant on: Tel: +233 24 66 286 11
Email Us: themasters.comp@gmail.com

Comments
Post a Comment